
Submit: Add Specimen
The data entered on the Add Specimen screen provides information about the specimen and the parties involved in the collection of it. If not previously added, provisions have been made on this screen to add a locality, if needed. Locality data is not required. Any instruction label that is followed by an * is a required field and must be completed before submitting.
Path to Add Specimen: header menu > Tools > Submit > Specimen
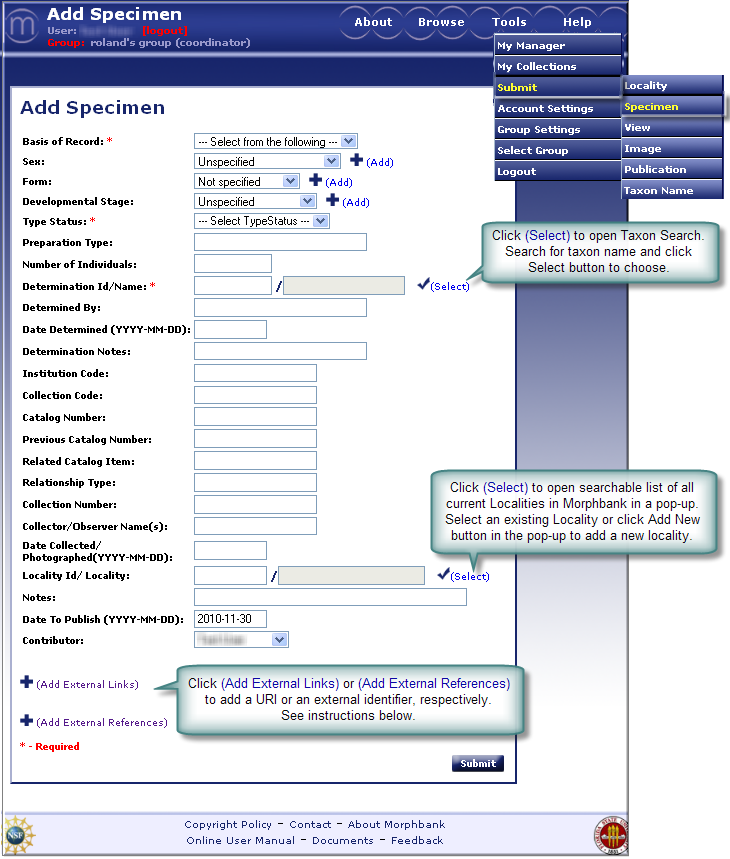
- Basis of Record (Required)
Choose one of the options from the drop-down list. Choices are: Observation, Living Organism, Specimen, Germplasm /Seed. The list of options is based on the Darwin Core standard http://darwincore.calacademy.org/. Basis of Record is defined as: A descriptive term indicating whether the record represents an object or observation. Another definition reads: The nature of the sample. If additional options are needed, please contact mbadmin at scs dot fsu dot edu. - Sex, Form, Developmental Stage
All three of these fields work in the same manner. Options can be added to any of these drop-downs by selecting the add icon.
This process is available only for those authorized through login permissions. (Only a
lead scientist and coordinator of group can add new options). If a scientist
needs additional options, please contact mbadmin at
scs dot fsu dot edu.
icon.
This process is available only for those authorized through login permissions. (Only a
lead scientist and coordinator of group can add new options). If a scientist
needs additional options, please contact mbadmin at
scs dot fsu dot edu.

Choose one of the options from the drop-down list for each of the 3 fields. The drop-down lists contain terms based on community consensus. The choices for Sex might consist of: Male, Female, Bisexual, Indeterminate (if the specimen was examined but the sex could not be determined), Unknown (if the specimen was not examined for its sex), Transitional (if the specimen is between sexes, like sequential hermaphrodites).
If the option desired is not in the drop-down, click the
and enter the appropriate text on the Add Sex page and Submit . A
confirmation message will appear on screen to let the user know that the
addition was successful. Choosing the select icon will redirect the
information back to the Add Specimen screen. The added information
will be a permanent addition to the list of options. Now choose the
appropriate sex from the drop-down list. Repeat for Add Form and Add
Developmental Stage, adding terms to the drop-downs, as needed.
- Type Status (Required)
Choose from the drop-down list, the type status of the specimen. The type status indicates the kind of nomenclatural type that a specimen represents. The Morpbbank system can store any number of determinations and type designations for a specimen; contact the mbadmin at scs dot fsu dot edu if some of your specimens require more than a single type designation or determination. - Specimen Preparation Type
Enter the type of specimen preparation, if applicable. This is the preparation of the whole specimen, before incorporation into the collection. Examples include Pressed and Dried and 70% ethanol. - Number of Individuals
Enter the approximate number of individuals that were collected /observed. This is the number of individuals in the lot or container representing the specimen record. - Determination Id/ Name (Required)
Click the icon seen with the
Determination Id / Name field to open the Taxon Name Search screen. Traverse through the levels until
the appropriate scientific name is found. Then click the select
icon, the user will automatically be directed back to the Add
Specimen screen where the appropriate name and id number will be filled
in.
icon seen with the
Determination Id / Name field to open the Taxon Name Search screen. Traverse through the levels until
the appropriate scientific name is found. Then click the select
icon, the user will automatically be directed back to the Add
Specimen screen where the appropriate name and id number will be filled
in.
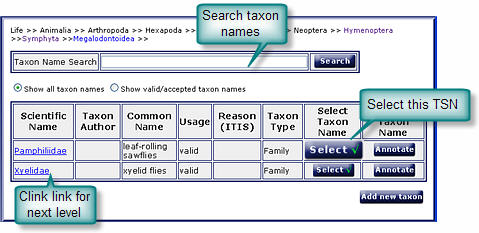
If a new taxon name needs to be added select the Add New Taxon button that is visible from the family level. The Add Taxonomic Name screen will popup. (This option is only available for authorized users.) For complete instructions on this process see the ITIS, Add Taxon Name section of this manual. - Determined By
Enter the name(s) of person(s) who determined the taxonomic category of the specimen. Add the names separated by a comma. - Date Determined
Enter the date when the specimen was determined. Use the format: yyyy-mm- dd. If the day is unknown enter yyyy-mm-00, or if the month is unknown enter yyyy-00-00. The Date should be current or a past date. - Determination Notes
If the person who made the determination made any specific notes about the determination of the specimen, enter those notes here. - Institution Code
Enter the code for the institution to which the collection belongs. - Collection Code
Enter a unique alphanumeric value which identifies the collection to which the specimen belongs. - Catalog Number
Enter a unique alphanumeric value which identifies the specimen record within the collection. It is recommended that this value provides a key by which the actual specimen can be identified. If a biological specimen (individual organism) is represented by several collection items, for instance representing various types of preparation, this value should identify the individual collection item. - Previous Catalog Number
Enter a previous catalog number if the specimen was earlier identified by another catalog number in the current catalog or at/in another institution/catalog. A fully qualified catalog number is preceded by Institution Code and Collection Code with a space separating each sub element. Referencing a previous catalog number does not imply that a record for the referenced item is or is not present in the corresponding catalog, or even that the referenced catalog still exists. - Related Catalog Item
Enter a fully qualified identifier of a related catalog item (a reference to another specimen). A fully qualified identifier consists of Institution Code, Collection Code and Catalog Number, with a space separating each of the three sub elements. - Relationship Type
Enter a string (named value) that specifies the relationship between the specimen and the related catalog item. Example of possible values include: "parasite of", "epiphyte on", "progeny of" etc. - Collection Number
Enter an identifying number (a string) which was applied to the specimen at the time of collection/observation. This number links different parts/preparation types of a single specimen and field notes with the specimen. - Collector(s) Name(s)
Enter the name(s) of the collector(s) responsible for collection of the specimen or taking the observation. - Date Collected
Enter the date when the specimen was collected (date when the collection process began). The date format should be yyyy-mm-dd. If the day is unknown enter yyyy-mm-00 or if the month is unknown enter yyyy-00-00. The date entered must be a current or past date. - Locality
Click the icon seen with the
Location Id / Locality field to open the Locality search/selection screen. Use the Keyword
search to find the appropriate locality. Then click the select
icon and the user will automatically be directed back to the Add
Specimen screen where the appropriate Locality and id number will be filled
in.
To sort the list of localities, select the Sort By criteria from the drop down list(s). The more criteria selected, (up to 3 levels) the more refined the sort will be.
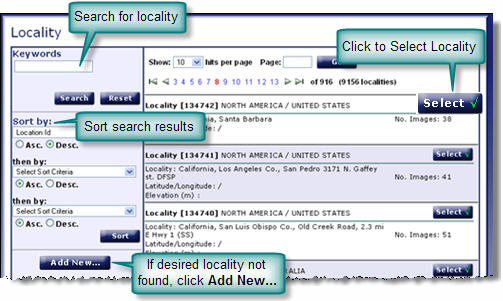
If the desired locality/id is not on the Locality screen, click on the Add New button to add a Locality. Once the fields are populated, click Submit to Add the new Locality and the user will be prompted to click "Select" to auto-fill the Locality field and may then continue with the Add Specimen screen. - Notes
Enter additional text notes related to the specimen record. This is a good place to add voucher label information (i.e. DNA, anatomical, etc.) or other information such as the duration of the collection/trapping sessions noting a range of dates the process took place. - Contributor (Required)
Select the name of the contributor (person having the authorization to release the images) from the dropdown list. The contributor can be different from the submitter (person entering the data). If you need to add new entries to this list, please contact mbadmin at scs dot fsu dot edu. - Add External Links to this record. For complete
instructions on providing external links refer to External Linking in the Information Linking section of this manual. Click on Add External Links to open this feature. See next:
- Choose the Type of External Link (some examples are: GenBank, Project, Institution, ...)
- Enter the text for the Label the user in Morphbank will click to go to this URL.
- Enter the complete URL here.
- The Description field is optional.
- Click the + icon to add additional external links.
- Click the - icon to remove any outdated links.
- Add External References to this record. For complete
instructions on providing external references refer to External Linking in the Information Linking section of this manual. Click on Add External References to open this feature. See next:
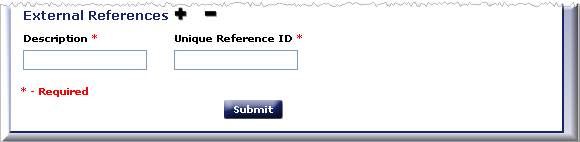
- Enter the Description for the External Reference. This will appear to the Morphbank user as a label in front of the unique id.
- Enter the Identifier unique for this locality in the remote database in the Unique Reference ID field.

- Unique Reference ID best practice is to combine an acronym prefix + an identifier.
- The database table storing this identifier requires the values be unique. If the identifier string entered is already in this table, the user needs to figure out a different prefix.
- For example, a user, Fred S Unstead, has a Specimen with ID=1234567 and puts his initials as the prefix for: FSU:1234567
- Florida State University (FSU) entered Specimen IDs with prefix=FSU + an identifier (1234567).
- Fred S Unstead needs to change his prefix in some way, for example: FSU-S:1234567 (where the S is for Specimen).
- The external unique reference ID can be used in future uploads and for updates of current records in Morphbank.
When the Add Specimen form has been completed, Submit to complete the add specimen process. A message will confirm that you have successfully added a specimen. From this point the user can continue to add additional specimens or return to the Upload (Submit) screen.
Next |
Contents |