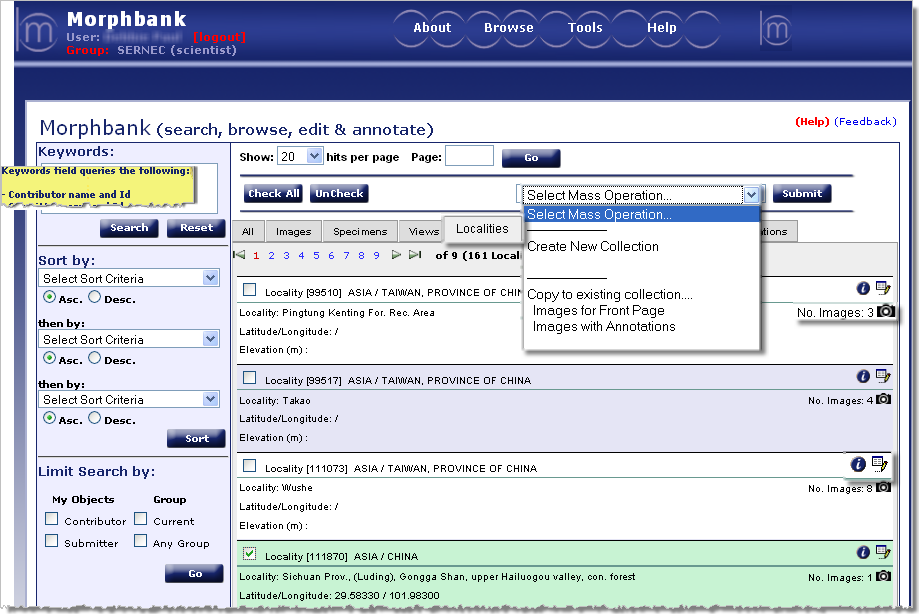
Localities tab - My Manager
All the features and tools found here are used the same way in other tabs of My Manager. All Localities contributed/submitted to Morphbank will be seen in this tab. A Locality record contain details for a Specimen's given locale when it was observed and/or collected. More than one Specimen may be associated with a given locality. Clicking on the camera icon for a given Locality jumps to all images associated with that locality.
Paths to My Manager Localities tab:
- Header: hover over Browse to open drop-down > select Locality from drop-down OR
- Header: click Browse to open My Manager interface > click Localities tab

Features and Functions of the Localities tab
Morpbhank users catch on quickly due to the modular nature of the tools and icons. Note the various features in the above screen shot are explained next.
 : please use this link to our automated feedback system.
We appreciate your comments so that we can continue to improve and enhance Morphbank. Clicking on (Help) opens this Manual.
: please use this link to our automated feedback system.
We appreciate your comments so that we can continue to improve and enhance Morphbank. Clicking on (Help) opens this Manual.- Keywords: To use this powerful search feature, hold the mouse over the Keywords box to see a list of fields the Keywords queries. Enter a term or terms. Note that searches are boolean and. Partial words can also be entered as all terms entered are wild-carded. Hover over to see a list of fields the Keywords accesses. See the yellow note above.
- Limit Search by: allows a user to view only the objects personally contributed/submitted AND/OR those from a particular group. Use the Header Menu Tools > Select Group > Choose group from sub-menu feature to change groups OR use the Group link in the Header on the left side of the Main Screen under User name.
- Check box: Note the
 to the left of each Locality Id and Title. Use this
feature to Select one or more Localities which will then be highlighted. A particular action can now
be applied to all the checked Localities at one time using the Select Mass Operation feature. If a
user wishes to collect all the Localities on a given page into a collection, use the Check All button,
then Select Mass Operation > Create new collection > click Submit button.
 - Select Mass Operation: After checking one or more Localities with the check box feature, options in the drop-down of Select Mass Operation can be applied to all the Localities checked. An example would be: gathering all the checked Localities into a new or existing collecion.
- Submit: Click this button to carry out the Mass Operation selected.
- Icons: The icons and their functions are explained fully in Morphbank
Guide to Graphic Buttons. An abbreviated
explanation can be found on the All page
for My Manager.
- The
 icon shows metadata for the object,
in this case the Locality in a format that Morphbank refers to as the Show.
- Using the
 Edit icon gives users access to
change/update data for any Localities they've contributed/submitted.
- Note the
 is a link to all
images in Morphbank linked to this particular Locality.
- The
- Creating Collections with My Manager: To group objects (in this case, Localities)
together creating a collection, follow the steps in the box next:
Short-cut instructions to creating a collection
- use the
 check box next to each desired locality.
Each locality checked will be highlighted in green.
- After checking all desired items, go up to the Select Mass Operation drop-down and choose the desired action (like Create New Collection or Copy to Existing Collection).
- Click the
 to perform the Mass Operation selected.
- Any Collections created can be seen in the Collections tab.
- use the
Add a Locality to Morphbank
Edit a Locality in Morphbank
Known Version Issues
Introduction to My Manager
Next |
Contents |


